Prerequisite steps needed…
Step 1: Read my post 2 Knots. Then come back. It’s important to have a knot down so well that you don’t have to think about it. Then come back and move on to step 2.
Step 2: Learn to tie a rope halter correctly right now. The halter will be much safer and will work much better if you do it correctly. This is very important. Please learn to do it correctly. It only takes a minute for a lifetime of coolness. Press play below.
Step 3: Proceed on to Haltering and Tying a Horse below.
Haltering and Tying a Horse
Now that the prerequisites are done we can take it from the beginning.
Approaching a horse should be done the same way whether you are in a stall, corral or pasture. Don’t hide anything. Stay open and show the horse everything you have. I see many people hiding the halter from the horse then when they get close spring the news on them that it’s halter time. Don’t do this. Be open and honest with your horse that it’s time to get a halter on. Does this mean that your horse might see you coming and run away? Yes it might mean that. But given some time and consistency most horses will get used to the idea that it’s time to work and come around to enjoying the process. But keep in mind that if the first thing you do when starting your day with your horse is surprise him with a halter you’re starting your time with your horse with proof that you shouldn’t be trusted. First thing we always want to start off with is showing the horse that you are not going to lie to them, you won’t be deceitful and you won’t pull any surprises. When you are working with him he can feel safe about you and your intentions. If not, we are setting him up for a natural fight-or-flight reaction.
So…
Get your halter ready. Make sure you know where everything is. The nose band, the long end, the buckle or loop. Don’t try to get things figured out when you’re next to the horse. Enter the area showing your horse your halter. Open your arms and approach with your hands out, palms up so they can come and smell you. If they come to you, let them smell your hand. You’ll feel the hot air coming from their nose. After they smell you, they’ll usually get bored and move on to the next thing. This is when you can move in quietly onto their left side facing the same direction they are and lift the halter up over their nose. Then pass the long end of the halter over the head just behind their ears and either buckle or tie the halter in place.
Then…
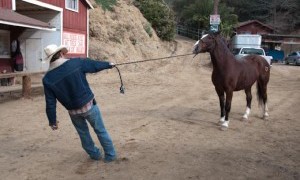
Holding the horse on your right side walk them to your desired washing or tacking place. Make sure you look where you’re going and allow the horse to follow. When you are holding the extra lead rope do not create a circular loop in the rope—if the horse gets scared, you will lose something important, like a hand. If you look at him, he may ask why you are looking at him and get nervous that you aren’t sure about what you’re doing and decide that you may not be the best person to trust right now and go backward. Again, look where you’re going and allow the horse to follow.
Next…
How to secure your horse. So many millions of ways. Tie rails, cross ties, trees, ground tying…
Take a look at the post 2 Knots if you are tying to a tie rail.
Take a look at this if you are using cross ties:
Whatever way it is that you secure your horse to the place you want them to be, keep a couple things in mind:
- Don’t put any limb in a loop. If something happens and the horse gets scared, he will move away from the situation, usually backward. This will tighten any loop you may have your limb in. You will lose this limb. So keep them out of loops. You can’t be too careful here.
- Don’t get in between your horse and a hard place. Tie rails, walls, beams all are very hard places. Stay in a place while you are creating the knots or connections that if anything happens you can easily remove yourself and any part of yourself from the situation.